Posts

Multi-Layer Perceptron (MLP) with Keras

Image
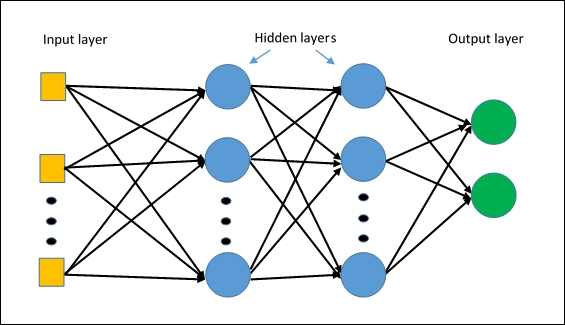
Multi-Layer Perceptron is famous nowadays as we have enough processing power to compute heavy operations. It consists of 3 layers: input, hidden and an output layer. In this post, we will implement the neural network with Keras . Keras is a python deep learning library. In the dataset, we have ASCII representation, where each letter of the alphabet is represented by a matrix of 12x13 binary values. Here, we will train our model and check the analyze the learning curve. So first we will import the required packages and load the data. import numpy as np from keras import models, layers, optimizers, utils from random import randint from keras.layers.core import Activation from keras.layers import Dropout from matplotlib import pyplot as plt dataset = np.loadtxt('pattern1.txt', delimiter=" ") In our data file, we have A to Z letter, so we will transform our data first and then split the train and test data. We’ll also prepare our target column as in

Find best hyperparameters using Grid Search in SVM (Support Vector Machine)

Image
The hyperparameters optimization is a big part now a days in machine learning. In this post, we’ll use the grid search capability from the sklearn library to find the best parameters for SVM. We’ll be using wine dataset for this post( Link ). Here, I have divided the whole dataset as train and test data randomly. Grid search is the hyperparameter optimization technique. It is provided as GridSeachCV in sklearn. Let’s start with importing packages and loading the data. from sklearn.model_selection import train_test_split from sklearn import svm import numpy as np from sklearn.model_selection import StratifiedShuffleSplit from sklearn.model_selection import GridSearchCV # loading the data wine_train = np.loadtxt('wine.train',delimiter=',') wine_test = np.loadtxt('wine.test',delimiter=',') x = wine_train[:, 1:13] y = wine_train[:, 0] X_Test = wine_test[:, 1:13] x_train, x_test, y_train, y_test = train_test_split(x,y) Now, we will

What is Cross-Validation? Perform K-fold cross-validation without sklearn cross_val_score function on SVM and Random Forest

Image
Cross-validation is a model evaluation method. Generally, we use it to check the overfitting of the trained model. If the whole dataset is divided into train and test data, then the chances are high that the train model might not perform well on unseen (test) data. We can tackle this problem by dividing the whole dataset into 3 sets: train, validation and test dataset. Validation set will be used to check performance before test data is applied. There are several methods to perform cross-validation such as holdout, K-fold, leave-one-out cross-validation . There are plenty of machine learning tools in python. The range varies from sci-kit -learn, TensorFlow, Keras, Theano, Microsoft CNTK. All of these provide excellent support and tools to build your models, work through datasets. In this post, we will see an alternate way to k-fold cross-validation . Further, we will use the script for SVM and Random Forest Classifier. K-Fold Cross Validation We divide the whole dataset

Apriori algorithm implementation in R

Image
Introduction it is an algorithm for frequent itemset mining and  association rule learning  over transactional databases. It proceeds by identifying the frequent individual items in the database and extending them to larger and larger item sets as long as those itemsets appear sufficiently often in the database. The frequent itemsets determined by Apriori can be used to determine  association rules  which highlight general trends in the database ,  this has applications in domains such as  market basket analysis . This post is about the implementation of the apriori algorithm in R not to the detailed explanation of it. First, Download and install R Studio from  link  if it is not installed in your system. 1. First, install the required packages named - arules and apriori.    Go to Tools -> Install Packages --> arules/apriori 2. Importing your data set  The data import features can be accessed from the environment pane or from the file menu. The importer

Android Studio - Overview

Image
Nowadays Android is spreading its wings with more enhanced versions such as Android Nougat, Oreo. There are several IDE ( Xamarin ,  PhoneGap ) available which can be helpful to work with Android development. Android Studio is an official IDE for Android App Development. It allows us to write better code with an intelligent code editor which provides code completion for Java, Kotlin, c/c++ languages. You can download it from the  link . IDE The  toolbar  lets you carry out a wide range of actions, including running your app and launching Android tools. The  navigation bar  helps you navigate through your project and open files for editing. It provides a more compact view of the structure visible in the  Project  window. The  editor window  is where you create and modify the code. Depending on the current file type, the editor can change. For example, when viewing a layout file, the editor displays the Layout Editor. The  tool window bar  runs around the outside